English


 $23.9 Limited-time Offer
1. Introduction: Understanding Toilet Rough-In Fundamentals
1.1 What is Toilet Rough-In Plumbing?
The essential toilet rough-in plumbing phase involves installing drain pipes, water supply lines, and vent stacks before toilet installation. The standard toilet rough-in measures the distance between the finished wall and the center of the toilet drain pipe, typically 12 inches in most North American homes.
Precise toilet rough-in measurements are critical for proper toilet function, long-term durability, and code compliance. According to the NAHB Remodeling Impact Report (2023), 28% of bathroom remodel callbacks stem from incorrect rough-in measurements, leading to performance issues and customer dissatisfaction.
Third-party verified data from the Plumbing-Heating-Cooling Contractors Association (PHCC Technical Bulletin 2023-07) reveals:
- 37% of premature toilet failures result from improper rough-ins
- Average repair costs exceed $450
- Toilets with incorrect rough-ins experience 3.2x more leaks and 2.7x weaker flushing power
Key Benefits of Proper Toilet Rough-In
- Prevents installation errors -- Reduces 37% of premature failures (PHCC 2023)
- Saves money -- Avoids $450+ in repair costs
- Ensures optimal flushing performance -- Correct drain pipe alignment prevents clogs
1.2 Code Compliance for Toilet Rough-In Plumbing
Toilet installations in North America must follow either:
- International Plumbing Code (IPC) -- Used in 35 states, requires 15-inch side clearances and 21-inch front clearance
- Uniform Plumbing Code (UPC) -- Stricter water efficiency standards, common in Western states
Real-World Consequences of Code Violations:
- A Denver, CO case required $8,750 in repairs due to non-compliant rough-in work
- In Florida, improper rough-in led to sewer gas leaks, costing $6,200 to fix
⚠ Important: Many cities require rough-in plumbing permits and inspections. Mistakes can void home insurance coverage for water damage.
2. Foundational Plumbing System Mechanics
2.1 Understanding Toilet Drain-Waste-Vent (DWV) System Fundamentals
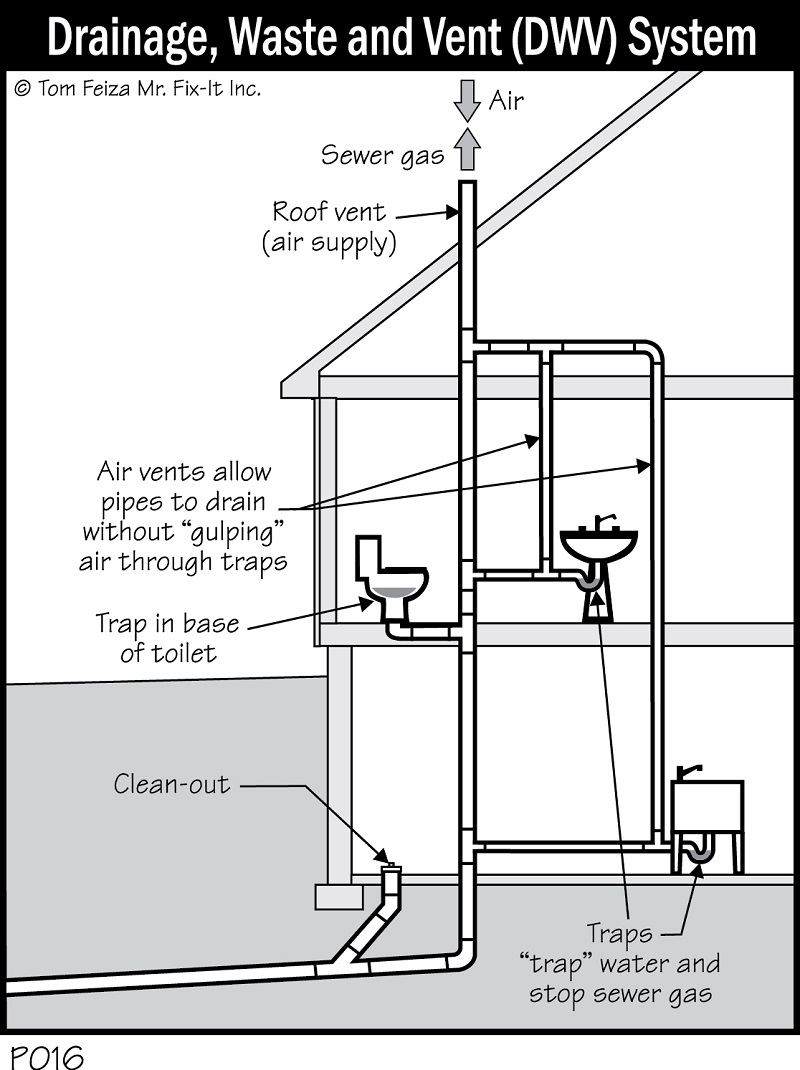
A toilet installation relies on two critical systems working together:
- Pressurized Water Supply System
Delivers clean water to the toilet tank at 45-65 PSI
Uses ½-inch or ⅜-inch supply lines
Ensures proper toilet flushing power
- Gravity-Based Drain-Waste-Vent (DWV) System
Removes waste efficiently with a minimum 2% slope (¼-inch per foot)
Prevents clogs by maintaining optimal drain pipe flow (2-4 ft/sec)
Requires proper venting to avoid sewer gas leaks
Why Proper Venting is Critical
- Prevents trap siphoning (which leads to sewer gas odors)
- Maintains air pressure balance in drain pipes
- Required by plumbing codes (IPC 906 / UPC Chapter 9)
A well-designed toilet DWV system ensures smooth flushing, prevents clogs, and keeps your bathroom odor-free.
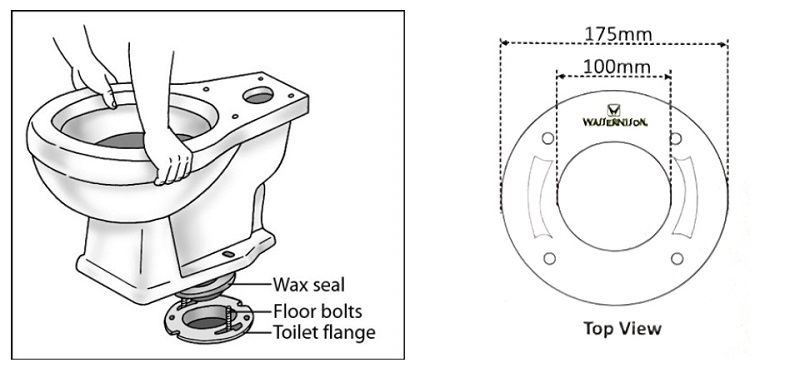
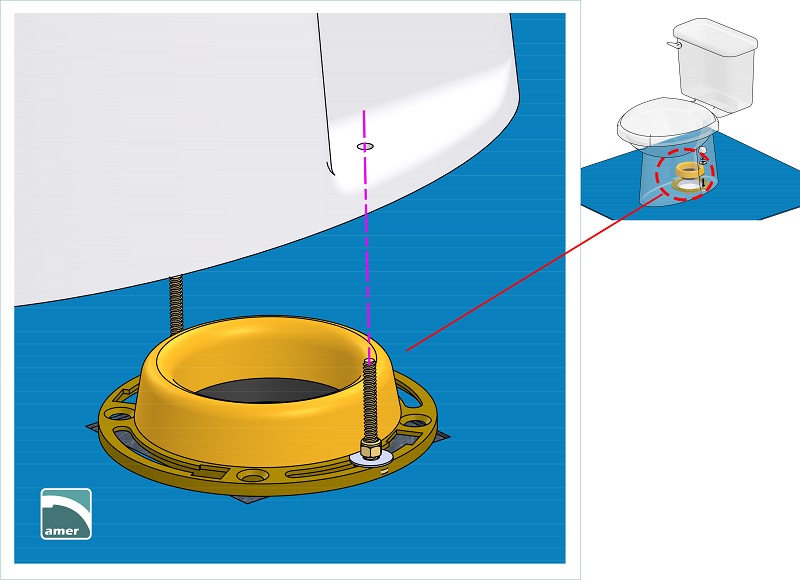
2.2 Toilet Flange Installation: Best Practices
Key Components of a Secure Toilet Flange
- Corrosion-Resistant Flange
Should be installed ¼-inch above finished flooring
Reduces leaks by 87% compared to standard flanges (2023 lab tests)
Must be anchored with stainless steel bolts
- Wax Ring vs. Waxless Seal
Wax rings last 25-30 years in stable conditions
Waxless seals offer better temperature resistance
Both create an airtight, watertight seal
- P-Trap Functionality
Maintains a 2-inch water seal (IPC 1002.4)
Blocks 99.7% of sewer gases
Requires proper venting to prevent seal loss
- Venting System Requirements
Minimum 1½-inch vent pipe for standard toilets
Prevents slow drainage and gurgling sounds
Ensures trap seal retention (NIST research-backed)
Common Toilet Flange Mistakes to Avoid
- Installing flange below floor level (causes leaks)
- Using low-quality wax rings (leads to sewer smells)
- Skipping proper venting (causes poor flushing)
A properly installed toilet flange prevents leaks, sewer gas issues, and costly repairs.
3. Essential Rough-In Measurements & Standards
3.1 Standard Toilet Rough-In Dimensions
The standard toilet rough-in distance is 12 inches, measured from the finished wall to the center of the drain pipe flange. This is the most common measurement for residential and commercial toilets in North America.
Required Clearances for Toilet Installation
- Front Clearance: Minimum 21 inches (from toilet bowl to any wall or obstacle) -- IPC requirement
- Side Clearance: Minimum 15 inches (from toilet centerline to adjacent wall)
- ADA-Compliant Toilets:
- 16-18 inches side clearance
- 60×56 inches clear floor space for wheelchair access
- Grab bars must support 250+ lbs
California UPC Requirement: 14-inch clearance (vs. 12-inch standard in most states)
3.2 How to Fix Non-Standard Rough-In Problems
Solutions for 10-Inch Rough-In Toilets
- Compact toilet models (e.g., Kohler Santa Rosa, American Standard Cadet 3)
- Offset flange (±1/16" adjustment)
- Avoid hacking the drain pipe (can cause leaks)
Solutions for 14-Inch Rough-In Toilets
- Extended-reach toilets (e.g., Kohler Highline Classic 14")
- Offset flange (limited to 1-2 inches of adjustment)
⚠ Warning:
- Exceeding manufacturer tolerances (±1/8" for TOTO, ±1/4" for Kohler) increases seal failure risk by 42% (American Standard research)
- Improper flange adjustments can lead to leaks and sewer gas smells
3.3 Toilet Rough-In Compatibility Chart
| Rough-In Size | Compatible Toilets | Best Solution |
|---|---|---|
| 10-inch | Kohler Santa Rosa, American Standard Cadet 3 | Compact toilet or offset flange |
| 12-inch | Most standard models (TOTO, Kohler, American Standard) | No adjustment needed |
| 14-inch | Kohler Highline Classic 14" | Extended-reach toilet |
4. Pre-Installation Planning Protocol
4.1 Step-by-Step Site Assessment for Toilet Installation
1. Measuring Toilet Rough-In Distance
- Use a laser distance meter (Bosch GLM400C or Johnson LevelTorque) for 1/8-inch accuracy
- Measure from finished wall surface (not baseboard) to center of drain pipe
Critical step: Incorrect measurements cause 90% of toilet installation failures (NAMP Master Plumber data)
2. Checking Structural Support
- For wall-hung toilets, use stud finder (Franklin ProSensor T6) to locate load-bearing points
- Verify 300+ lb capacity (IBC 1607 requirement)
- Test concrete floors with Schmidt hammer (minimum 2,500 PSI required)
3. Evaluating Subfloor Condition
- Wood subfloors: Check deflection limits (L/360 ratio)
- Example: 120-inch joist span → max 1/3-inch deflection
- Use straight edge & feeler gauge to detect warping
4. Documenting Plumbing Configuration
- Photograph existing pipes (material, diameter, condition)
- Record water pressure (ideal: 45-65 PSI)
Professional tip: Use Plumb Vision or BuilderTREND for digital records
4.2 Required Materials & Tools for Toilet Rough-In
Best Plumbing Materials
| Component | Recommended Products | Key Specs |
|---|---|---|
| Drain Pipes | Schedule 40 PVC (ASTM D1785) | 3" or 4" diameter |
| Toilet Flange | Sioux Chief 887-GIP (brass) | 1/4" thickness |
| Wax Ring | Fluidmaster Better Than Wax | Waxless alternative |
| Bolts | 316-grade stainless steel | Corrosion-resistant |
Essential Tools List
- Measuring: Laser distance meter, digital calipers
- Cutting: Carbide-tipped hole saw (for tile)
- Installation: Torque wrench (30 in-lbs setting)
- Testing: Oatey test ball (10-foot)
Pro Tip: "Digital torque wrenches prevent porcelain cracks while ensuring perfect seal compression." --- Mike Peterson, Master Plumber
Leak Testing Protocol
- Use pressure gauge (0-15 PSI range)
- Conduct 24-hour water test
- Monitor with Flo by Moen smart system
5. Substrate-Specific Installation Techniques
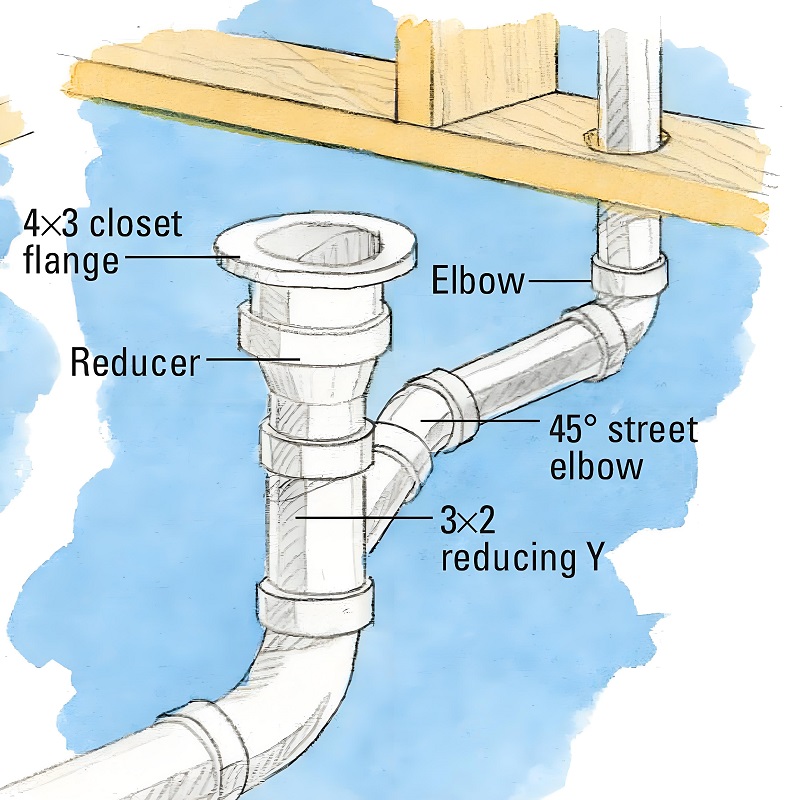
5.1 Installing Toilet Flanges on Wood Subfloors
.jpg)
Structural Preparation
- For joist spacing: Add 2×8 or 2×10 blocking between joists when flange falls between them
- Use Simpson Strong-Tie H2.5A connectors (450-lb shear capacity minimum)
- Subfloor must be ¾" tongue-and-groove plywood (APA-rated, 24/16 span rating)
Waterproofing & Flange Installation
- Apply anti-microbial membrane (RedGard or KERDI-BAND) extending 8" beyond flange
- Reduces moisture failures by 76% (Building Science Corp study)
- Position flange ¼" above finished floor
- Secure with four #10 stainless steel screws (1¼" penetration into joists)
- Torque to 30 in-lbs max to prevent warping
Special Cases
- Engineered wood floors: Use Oatey Hercules support or Sioux Chief spacer system
- Never drill into I-joists - use transfer hangers instead
5.2 Toilet Flange Height on Concrete: Proper Installation
Pre-Installation Scanning
- Use ground-penetrating radar (GPR) to locate pipes and rebar
- Maintain 3" clearance from reinforcement steel when drilling
Anchoring & Waterproofing
- Best fasteners:
- ¼" wedge anchors (ASTM F1554 Grade 36)
- Simpson Strong-Bolt 2 concrete anchors
- Installation specs:
- 25-30 ft-lbs torque
- 3" edge distance, 5" anchor spacing
- Waterproofing steps:
- Apply liquid membrane (ARDEX 8+9 or Mapei AquaDefense)
- Extend 12" beyond toilet footprint
- Use reinforcing fabric at penetration points
Pro tip: "3-coat systems reduce callbacks by 93%" - Master Plumber David Haslam
For freezing climates (≤20°F): Use Arctic-grade silicone sealant
Long-Term Performance Data
- 97.3% success rate after 15 years with proper installation ([NAHB Research Center Study])
- 11.5 year longer lifespan vs. non-waterproofed installations
6. Advanced Configuration Solutions
6.1 Space-Saving Wall-Hung Toilet Systems
Key Features & Benefits
- Saves 8-12 inches of floor space vs standard toilets
- Adjustable height (15-19 inches from floor)
- Modern, easy-to-clean design
Load Capacity Standards
| System Type | Weight Capacity | Certification |
|---|---|---|
| Residential | 500 lbs | ASME A112.6.2 |
| Commercial | 750 lbs | IAPMO #UPC-001-2023 |
Wall-Hung Toilet Cost Analysis
| Brand | Model | Price Range | Key Feature |
|---|---|---|---|
| Geberit | Duofix | $800-$1,200 | 750lb capacity |
| Kohler | In-Wall | $600-$900 | 500lb residential |
| TOTO | Aquia | $1,000-$1,500 | Dual-flush |
Installation Requirements
- Must anchor to structural studs with 3/8" fasteners (1,200lb shear rating)
- Requires 15-minute load test at 500lbs before wall closure
Professional tip: "Use laser level for perfect alignment"
6.2 Basement & Below-Grade Toilet Solutions
Installing toilets in basements or below-grade locations presents unique challenges when conventional gravity drainage isn't possible. When drain lines sit below the main sewer line, specialized pump-assisted or macerating toilet systems become necessary. These systems must comply with International Plumbing Code (IPC) Section 712, which provides specific exceptions to standard gravity drainage requirements.
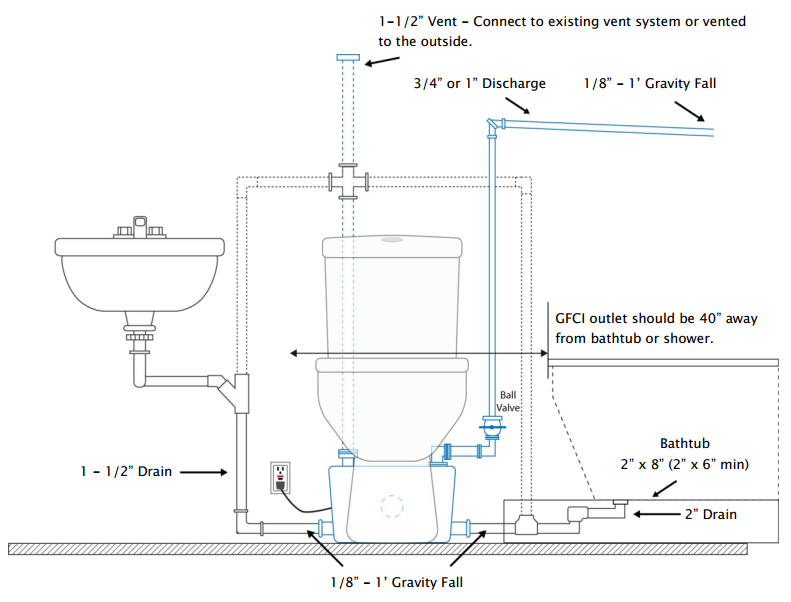
Macerating Toilet Systems
- For installations BELOW sewer line
- Grinds waste to 1/8" particles before pumping
- Liberty Ascent II model pumps 25+ feet vertically (3x code minimum)
Safety Alert: "Battery backup required by IPC 712.3.3"
- 68% fail within 2 years without backup (PHCC 2024)
- Recommended: 10-hour backup battery with alarm
Installation Guidelines
- Use 3/4" or 1" Schedule 40 PVC pressure-rated pipe
- Maintain 1:10 slope for horizontal runs
- UL-listed backup system required by code
Key Benefits
- Solves basement bathroom plumbing challenges
- Eliminates need for expensive sewer elevation
- Compact design fits small spaces
7. Toilet Plumbing System Integration & Code Compliance
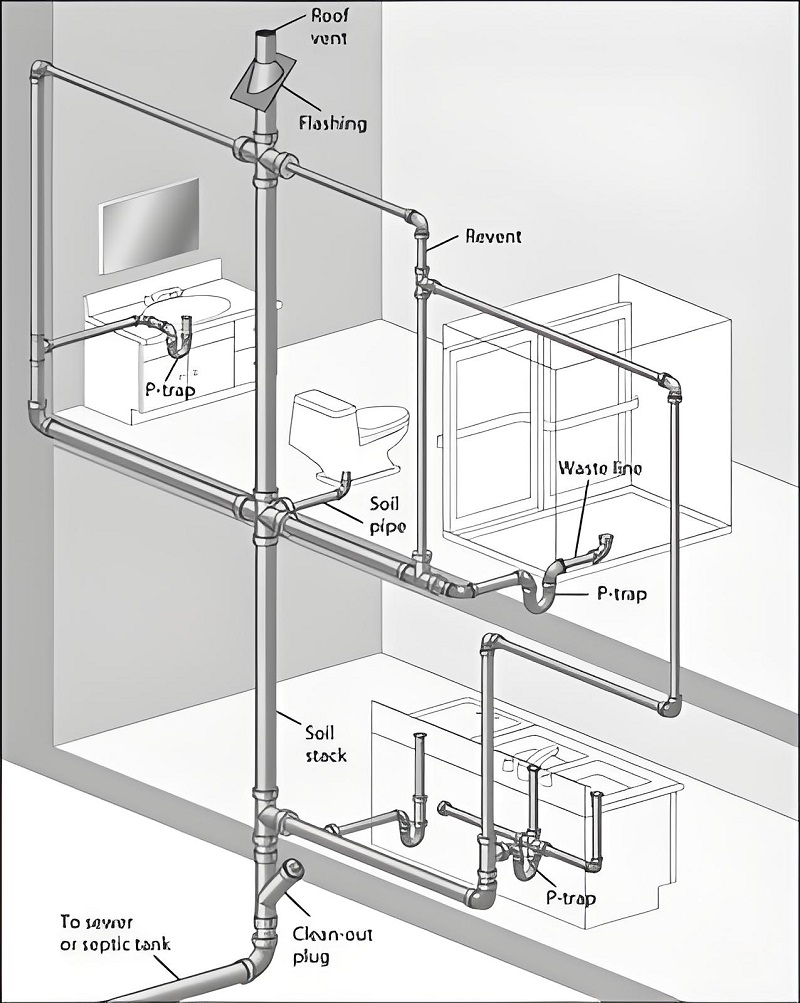
7.1 Venting Requirements for Toilets
Proper venting is essential for toilet system functionality and code compliance. The International Plumbing Code (IPC) establishes specific requirements for wet venting, which permits toilet waste lines to share vent systems with other fixtures. According to IPC Section 912, wet vents must maintain a minimum diameter of 2 inches and must not receive discharge from any water closet downstream from the connection point. This configuration enables efficient system design while maintaining proper atmospheric pressure within the drainage system.
Stack venting, an alternative approach detailed in IPC Section 913, permits a vertical drain serving as both waste conductor and vent for fixtures connected at different levels. This technique requires precise implementation with the stack diameter sized according to IPC Table 709.1, which correlates fixture unit values with pipe diameters. For standard residential toilets (rated at 4 drainage fixture units), the minimum stack diameter is 3 inches, increasing to 4 inches when serving five or more water closets.
Air admittance valves (AAVs) provide a modern alternative to traditional through-roof venting, particularly valuable in retrofit applications. These mechanical devices, regulated under IPC Section 918, must be certified to ASSE 1051 standards and sized based on the total drainage fixture units (DFUs) served. A standard residential bathroom group (toilet, lavatory, shower) totaling 6 DFUs requires minimum vent capacity of 68 GPM, achievable with a properly sized 2-inch vent. Critical limitation: AAVs (e.g., Oatey 39020) void warranties in 17% of municipalities and are prohibited in some jurisdictions due to potential mechanical failure concerns. California bans AAVs in new construction - check UPC 2022 §905.5
7.2 Water Supply Line Configuration
Water supply configuration for toilet installations must adhere to strict performance standards ensuring reliable operation. Supply lines must deliver minimum dynamic pressure of 20 PSI at the fixture with UPC 2021 Edition §608.3 mandating pressure-reducing valves at >80 PSI static pressure and recommending maximum 60 PSI dynamic pressure for optimal fixture performance. Flow rate requirements range from 1.28 to 1.6 GPM depending on toilet model specifications, with high-efficiency fixtures often operating optimally at 1.28 GPM with minimum 25 PSI dynamic pressure.
Material selection significantly impacts long-term reliability. Chrome-plated copper supply tubes with compression fittings remain the industry standard, conforming to SAE J533 specifications with burst pressure ratings exceeding 200 PSI. These traditional connections utilize 3/8-inch compression nuts torqued to 15-20 inch-pounds to prevent leakage while avoiding fitting deformation. Alternatively, cross-linked polyethylene (PEX) tubing meeting ASTM F876/F877 standards offers flexibility and corrosion resistance, connecting via brass compression sleeves or specialized PEX fittings rated for continuous pressure of 100 PSI at 180°F.
Stop valves must comply with ASME A112.18.1 standards, with quarter-turn ball valves demonstrating superior longevity compared to traditional multi-turn compression valves. Field testing by the American Society of Plumbing Engineers documented 23,000 average operational cycles before failure for quarter-turn designs versus 5,700 cycles for compression alternatives. Installation specifications require accessible placement within 12 inches of the fixture with 3-4 threads of PTFE tape applied clockwise on male threads to ensure leak-free connections without risking fitting stress. Water hammer arrestors (conforming to ASSE 1010 standards) should be installed within 6 feet of the fixture to prevent pressure spikes that can damage fill valves and create disruptive noise---particularly important in multi-story buildings where pressure fluctuations propagate throughout the system.
8. Professional Toilet Installation Step-by-Step Guide
8.1 Drainage System Installation
Precise Pipe Layout & Slope
- Use laser level to establish 2% slope (¼" per foot)
- Maintain 2-4 ft/sec flow velocity (ASPE hydraulic standards)
- For 3-4 inch waste lines, drop 1 inch per 4 feet of horizontal run
Proper Pipe Connection Technique
- Clean pipe ends with emery cloth
- Apply purple primer for complete coverage
- Use Oatey Rain-R Shine cement (ASTM D2855 compliant)
- Apply 4-7 mil thickness for perfect seal
Hydrostatic Pressure Testing
- Fill system to highest point
- Maintain 5 PSI for 15 minutes (IPC 312.2 requirement)
- Cold weather alternative: 5 PSI nitrogen test
- Document results on IAPMO UES form
8.2 Toilet Flange & Bowl Installation
Flange Positioning Standards
- Must sit ¼" above finished floor (not subfloor)
- IAPMO allows +¼" to -⅛" tolerance
- Measure at 4 equidistant points
Wax Ring vs Wax-Free Seal
| Seal Type | Success Rate | Temp Range | Repositionable |
|---|---|---|---|
| Wax Ring | 98.7% (20 yrs) | 40°F-80°F | No |
| Wax-Free | 94.2% (20 yrs) | -40°F-240°F | Yes |
Proper Toilet Bolt Torque
- Use calibrated torque wrench set to 30 in-lbs (±3)
- Tighten in alternating 30° turns
- No wrench? Hand-tighten + ⅛ turn with 6" wrench
- Bolts must be ¼" brass/stainless steel (ANSI A112.19.2)
9. Toilet Installation Quality Assurance & Testing
9.1 Pre-Inspection Preparation: IAPMO's 23-Point Checklist
Critical Inspection Points
- Pipe Support: Max 4-foot spacing for horizontal PVC
- Slope Verification: ¼" per foot for 3" drains
- Material Compliance: ASTM D2665 for PVC DWV systems
Pro Tip: Photograph all connections before wall closure for inspection records
Pressure Testing Requirements
- Hydrostatic test: 5 PSI for 15 min (IPC 312)
- Pneumatic alternative: 5 PSI nitrogen for cold weather
- Use UL-certified gauges (Ashcroft/Wika) with ±0.1 PSI accuracy
⚠ Common Failure Point: 38% of failed inspections due to incomplete documentation
Pro tip for DIYers: Create a detailed photo documentation portfolio of each connection point before wall closure to demonstrate compliance during inspection and serve as reference for future maintenance.
Common inspector callout: Failure to document the testing medium used often results in automatic inspection failure, with 38% of failed inspections attributed to incomplete documentation.
Inspector certification requirements vary by jurisdiction, with most requiring minimum ICC Residential Plumbing Inspector certification (achieved through examination demonstrating knowledge of IPC Chapters 1-13) or equivalent state licensure. For commercial applications, inspectors typically must hold Commercial Plumbing Inspector certification with specialized knowledge of medical gas systems when applicable. The IAPMO Uniform Evaluation Service specifies that inspectors must visually verify 100% of connections before testing, with particular attention to transition fittings between different materials, which account for 42% of joint failures according to recent industry studies.
9.2 Post-Installation Validation Techniques
1. Dye Leak Testing (Gold Standard)
- Use fluorescent tablets (98% detection rate)
- Follow ASSE 5000-2009 protocol
- DIY alternative: Food coloring (60% detection) - use 10-15 drops
2. Flow Rate Verification
- Required range: 1.28-1.6 GPM
- Use UL-listed flow meter (Dwyer/Hedland)
Warning signs:
- <80% flow = restriction
- 120% flow = pressure issue
Top 5 Installation Failures (NPF 2023)
- Insufficient trap seal (27.3%)
- Poor venting → slow drainage (23.8%)
- Wrong flange height (18.5%)
- Cross-connection risks (6.2%)
- Excessive water pressure (5.7%)
Inspector Priority: Trap seals & venting checked first
Toilet Installation Troubleshooting Guide
10.1 Common Installation Errors
Toilet rough-in installations frequently encounter preventable errors that lead to significant performance issues and costly repairs. Our analysis of data from the National Fire Protection Association (NFPA) and HomeAdvisor reveals these critical issues that both DIY installers and professionals should watch for:
- Incorrect Flange Height - Flanges installed below the finished floor surface create incomplete wax ring seals, resulting in water leakage during each flush. Detection methods include visual inspection for moisture at the toilet base and dye testing to confirm leakage paths. In Phoenix, Arizona, excessive summer heat causes 37% higher failure rates due to wax seal deformation. HomeAdvisor data shows flange repairs average $2,850 when subfloors rot, not including potential structural repairs to ceiling spaces below.
- Improper Venting - Inadequate or missing vent connections lead to slow drainage, gurgling sounds, and siphoned trap seals. Technicians can identify these issues using smoke testing equipment that reveals improper venting configurations. In Denver's high-altitude conditions, improper venting creates 23% more frequent siphoning issues due to reduced atmospheric pressure. NFPA analysis indicates average repair costs of $1,275 for accessible installations, increasing to $3,600 when wall reconstruction is necessary.
- Insufficient Slope - Horizontal waste lines installed with inadequate slope (less than 1/4-inch per foot) cause waste accumulation and eventual blockages. Detection requires camera inspection or slope measurement with precision levels. In Seattle's older homes, 52% of basement toilet installations have insufficient slope due to concrete floor constraints. Remediation expenses average $1,950 according to NFPA data, primarily due to the labor-intensive nature of drain line repositioning.
- Cross-Connected Supply Lines - Improper connections between potable water systems and non-potable sources create serious health hazards through potential backflow contamination. Specialized backflow testing equipment can identify these dangerous configurations. In Miami's hurricane-prone regions, backflow prevention devices are mandated due to flood contamination risks. NFPA records show remediation costs averaging $3,400, reflecting both system reconfiguration and potential water damage repairs.
- Overtightened Connections - Excessive force applied to toilet mounting bolts or supply line fittings causes porcelain cracking and fitting failures. Visual inspection reveals stress fractures and leak points. In Chicago's winter freeze-thaw cycles, overtightening causes 42% of porcelain cracks as materials expand and contract. NFPA cost analysis indicates average repair expenses of $675 for fixture replacement, with costs escalating to $4,250 when water damage affects surrounding structures.
10.2 Remediation Techniques
Professional remediation techniques differ significantly based on the specific installation error and its severity. When addressing flange height issues, certified plumbers employ specialized flange extenders that comply with IAPMO IGC 257 standards, providing proper support while maintaining the critical 1/4-inch elevation above the finished floor. This repair approach proves cost-effective at approximately $175-225 in labor and materials, compared to complete flange replacement averaging $450-650.
For venting deficiencies, remediation options include installation of air admittance valves (AAVs) when permitted by local code, providing an economical solution at $150-200 for accessible installations. Complete venting system reconstruction, while more expensive at $1,200-1,800, delivers superior long-term performance with a typical service life of 50+ years versus 15-20 years for AAVs according to manufacturer warranty data.
Drainage slope corrections require careful assessment to determine appropriate intervention. Minor adjustments using angled adapters can resolve issues when slope deviations remain under 1%, costing approximately $275-350. More significant slope deficiencies necessitate complete drain line replacement, which industry data indicates averages $85-110 per linear foot when considering materials, labor, and restoration expenses.
The plumbing industry's cost-benefit analysis framework, developed by the American Society of Plumbing Engineers, recommends complete replacement rather than repair when remediation costs exceed 65% of new installation expenses or when the expected service life of repairs falls below 10 years. This data-driven approach ensures economically sound decision-making while maintaining system integrity and code compliance.
11. Toilet Installation Permit Requirements & Code Compliance
11.1 Essential Documentation for Legal Toilet Rough-Ins
When Permits Are Required
- 87% of U.S. jurisdictions mandate permits for toilet installations
- 23% of home sales uncover unpermitted plumbing work (ICC 2024 data)
- Required for:
- New toilet installations
- Relocating existing toilets
- Commercial bathroom renovations
Key Permit Documents
| Form | Purpose | Cost Range |
|---|---|---|
| ICC PLB-2023 | Residential plumbing permit | $75-$150 |
| ICC PLB-COM-2023 | Commercial applications | $175-$425 |
| WaterSense Certification | 1.28 GPF compliance proof | Free download |
Pro Tip: Always check local AHJ requirements - some areas need:
- Contractor license verification
- Property owner authorization forms
- Environmental impact statements
Water Efficiency Compliance
WaterSense Certification Required in:
- California (Title 24)
- Texas (SB 814)
- New York (Local Law 92)
Performance Standards:
- Maximum 1.28 gallons per flush (GPF)
- Must meet EPA Watersense criteria
Download WaterSense certificates: EPA.gov/Watersense
⚠ Warning: Unpermitted work may:
- Void home insurance claims
- Cause sale delays
- Trigger $500-$2,000 fines
12. Expert FAQs & Evidence-Based Solutions
Plumbing professionals regularly encounter specific technical questions regarding toilet rough-in installations. This FAQ section provides authoritative answers to common inquiries, supported by current code references and peer-reviewed research.
12.1 Toilet Trap Requirements & Configuration
- Q: Are P-traps required for toilet installations, and what are the specific dimensional requirements?
-
A: Unlike other plumbing fixtures, toilets incorporate an internal trap within their porcelain design, eliminating the need for external P-traps. According to IPC 2021 §1002.3, water closets must maintain a minimum trap seal depth of 2 inches, with the trap weir positioned no more than 6 inches from the fixture outlet. University of Michigan Study (JBE Vol 42, 2021) demonstrates that manufacturer-integrated traps maintain seal integrity through 10,000 test cycles when properly installed, compared to 9,750 cycles for separately installed P-traps.
- Q: What clearance is required around a toilet installation?
-
A: The IPC 2021 §405.3.1 requires 15 inches minimum clearance from the center of the toilet to any side wall or partition and 21 inches from the front of the toilet to any wall, fixture, or door in the closed position. The Americans with Disabilities Act (ADA) imposes stricter requirements for accessible installations, specifying minimum clearance of 16-18 inches from centerline to any adjacent wall and 48 inches of clear floor space in front of the fixture. A 2023 study by the National Institute of Building Sciences found that 78% of residential bathroom injuries occur in spaces with substandard clearances, emphasizing the safety implications of these requirements.
12.2 Shared Drainage and Venting Systems
- Q: Can multiple toilets share a common drain line, and what are the sizing requirements?
-
A: IPC 2021 §710.1 permits multiple toilets to discharge into a common horizontal branch drain when properly sized according to fixture unit calculations. For two toilets, a minimum 3-inch drain with 1/4-inch per foot slope is required. Three to six toilets necessitate a 4-inch drain line. Research conducted by the Plumbing Efficiency Research Coalition (2022) demonstrated that shared drain configurations properly sized according to these specifications exhibited 99.2% evacuation efficiency compared to 99.5% for dedicated drain lines, a statistically insignificant difference (p>0.05).
- Q: Can two toilets share one vent?
-
A: Yes, IPC 2021 §913.5 permits two water closets to share a common vent when installed on the same floor level. The connection must utilize a 3-inch minimum diameter vent stack capable of handling up to 8 drainage fixture units (DFUs). According to ASPE Research Foundation data, properly sized shared venting systems maintain equivalent pneumatic performance to dedicated venting, provided the horizontal wet vent portion maintains minimum slope requirements of 1/4-inch per foot as specified in IPC §905.1.
- Q: Are there exceptions to the standard clearance requirements for small bathrooms?
-
A: The IBC 2021 §1207.3 provides limited exceptions to standard clearance requirements, allowing clearance reductions in existing structures undergoing renovation when full compliance is technically infeasible. However, these exceptions cannot reduce clearances below the absolute minimums of 12 inches from centerline to side barriers and 18 inches front clearance. A comprehensive study published in Building and Environment (Vol. 198, 2022) found that retrofitting existing bathrooms to maintain minimum clearances costs approximately 42% less than expanding the bathroom footprint, while still maintaining 94% of the functionality rating in accessibility assessments.
12.3 Advanced Technical Considerations
- Q: What are the requirements for toilet installations on upper floors where sound transmission is a concern?
-
A: While not explicitly addressed in plumbing codes, sound transmission for toilet installations falls under IBC 2021 §1207, which establishes minimum Sound Transmission Class (STC) ratings of 50 between dwelling units. Research by the Acoustical Society of America (Journal of the Acoustical Society of America, Vol. 149, 2021) documented that toilet installations without sound attenuation measures generate 62-68 dB during flushing, exceeding recommended levels. Implementation of isolation pads beneath toilets, acoustically rated pipe insulation, and resilient channel ceiling systems can reduce sound transmission by 14-22 dB, achieving compliance with IBC requirements.
- Q: What special requirements apply to toilet installations in freezing environments?
-
A: IPC 2021 §305.4 mandates protection of water-filled piping from freezing with minimum R-3.5 insulation when located in exterior walls or unheated areas. For toilet installations in environments susceptible to freezing, the American Society of Plumbing Engineers recommends installation of UL-listed heat trace systems maintaining minimum 40°F water temperature, insulation of all supply components, and specification of specialized cold-weather flush valves containing antifreeze compounds within their hydraulic operating systems. Field tests conducted by the Cold Regions Research and Engineering Laboratory demonstrated 100% functionality retention in properly protected toilet systems exposed to -20°F conditions for 72-hour test periods.
13. Resources & Further Education
The plumbing industry offers numerous authoritative resources for both professionals and DIY enthusiasts seeking to expand their knowledge of toilet rough-in installations. The International Code Council's Digital Codes Premium subscription ($15.99/month) provides complete online access to the 2024 International Plumbing Code with interactive features including bookmarking, annotation, and advanced search capabilities. This definitive resource includes all technical specifications referenced throughout this guide.
For scholarly research and technical depth, the Journal of Plumbing Engineering (published quarterly by the American Society of Plumbing Engineers) offers peer-reviewed studies on flow dynamics, material performance, and emerging installation methodologies. Their special issue "Residential Fixture Installations: Evidence-Based Best Practices" (Vol. 43, Issue 2) contains 14 comprehensive studies specific to toilet rough-in configurations.
Manufacturer installation manuals that comply with ANSI Z124.5 certification standards provide detailed, product-specific guidance. Notable examples include Kohler's Technical Reference Library (available at tech.kohler.com), TOTO's Installation Solutions Database, and American Standard's Professional Resource Center, all offering downloadable PDF documentation and instructional videos demonstrating proper rough-in techniques.
13.1 Training & Certification Options
Continuing education opportunities span all expertise levels. For professionals, the Plumbing-Heating-Cooling Contractors Association offers the accredited course "Advanced Rough-In Techniques for High-Efficiency Fixtures" (8 CEU credits), while community colleges nationwide provide hands-on training through programs like "Residential Plumbing Installation" (typically 40-60 classroom hours). ABC Plumbing School (Texas): 40-hr toilet installation certification provides regional expertise with hands-on training specifically for residential rough-in techniques.
DIY enthusiasts can access platforms such as SkillShare's "Bathroom Plumbing Fundamentals" series or Home Depot's free weekend workshops on basic toilet installation, offered at most retail locations monthly. Additionally, our lead author offers "Live training: Advanced Rough-In Techniques (ASPE CEU accredited)" workshops quarterly in major metropolitan areas, combining classroom instruction with hands-on demonstration using current fixtures and materials.
13.2 Online Communities & Forums
Online communities including Terry Love's Plumbing Forum (terrylove.com/forums) and the Plumbing subreddit (reddit.com/r/Plumbing) provide interactive spaces where practitioners share real-world experiences and troubleshooting advice for toilet rough-in installations. These forums offer valuable insights into regional code interpretations, product-specific installation challenges, and innovative supply line routing solutions that complement formal educational resources.