English


 $23.9 Limited-time Offer
What Is a 14-Inch Rough-In Toilet?
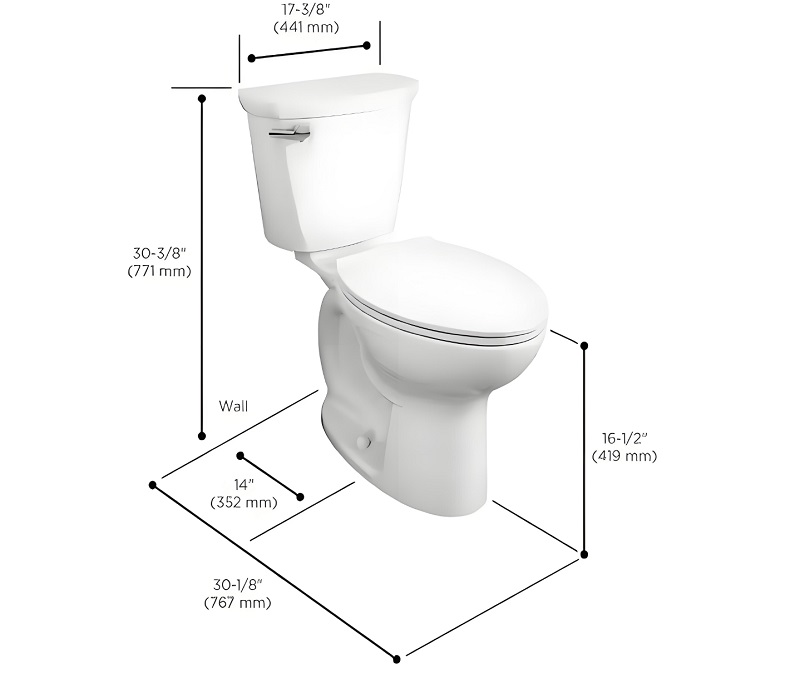
A 14-inch rough-in toilet is specifically designed to fit bathrooms where the waste pipe is positioned exactly 14 inches from the finished wall behind the toilet. This measurement, known as the "rough-in," is crucial because it determines how far the toilet sits from the wall during installation. Unlike modern 12-inch models, 14-inch toilets may protrude further into the bathroom space.
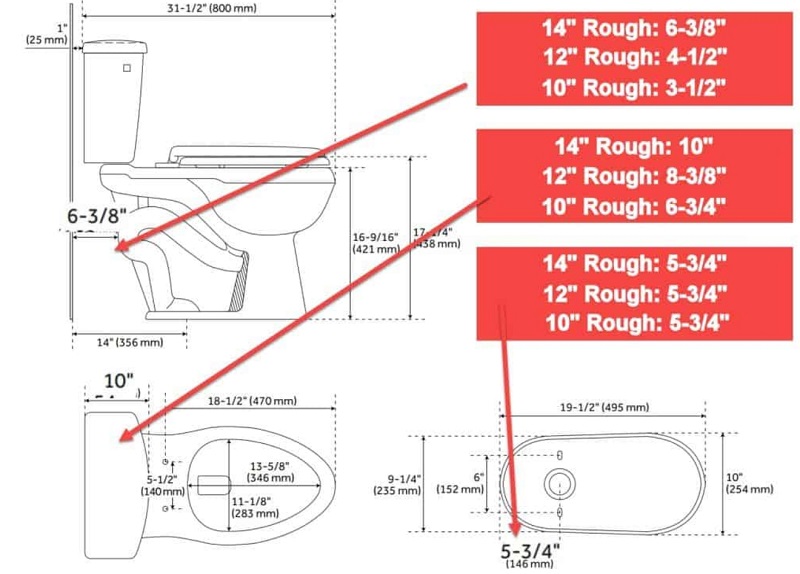
When we talk about 14-inch rough-in toilet measurements, we are referring to the distance from the center of the toilet flange (the pipe fitting that connects to the floor drain) to the finished wall surface (drywall or tile), excluding baseboards or molding. This is different from measuring to baseboards or molding—you need to measure to the actual finished wall surface. As defined by the Uniform Plumbing Code (UPC), the rough-in measurement excludes baseboards to ensure accurate installation.
The 14-inch rough-in toilet is much less common than the standard 12-inch rough-in that most modern homes use. However, if you live in an older home, especially one built between the 1920s and 1960s, you might discover that your bathroom has this larger rough-in measurement.
Why 14-Inch Rough-In Toilets Exist
Historical Context
Originally, 14-inch rough-in toilets were designed for larger bathrooms where space wasn't a concern. Older homes often featured more spacious bathrooms, and the extra two inches provided additional room behind the toilet for maintenance and cleaning. According to plumbing historians, 14-inch rough-ins were standard in pre-1960s American homes, particularly in residential construction between 1920 and 1950.
Structural Considerations
Some plumbers specifically used this measurement when floor joists or other structural elements made it difficult to position the drain pipe at the standard 12-inch distance. The 14-inch spacing helped avoid joist interference during pipe installation, as the extra distance allowed plumbers to route drain lines around structural supports without compromising the building's integrity. However, it's worth noting that these toilets may reduce front clearance by 2–3 inches compared to modern 12-inch models, which can be a consideration in smaller bathrooms.
Accommodating Bulkier Designs
Additionally, older toilets typically had larger tanks and different proportions compared to modern models. The 14-inch toilet rough-in accommodated these bulkier designs while ensuring the tank didn't sit too far from the wall, maintaining a balanced appearance despite the larger fixture dimensions.

Comparing 12" vs. 14" Rough-In Toilets
| Feature | 12" Rough-In | 14" Rough-In |
|---|---|---|
| Availability | 92% of models | 8% of models (Kohler, 2024) |
| Wall Gap if Mismatched | None | 2–3" gap (leak risk ↑40%) |
| Installation Flexibility | Requires offset flange | Direct fit |
The key difference between a 14-inch rough-in toilet and a standard 12-inch model lies in how the toilet bowl and tank are positioned relative to the wall. A true 14-inch toilet rough-in model is engineered specifically so that when properly installed, the tank sits appropriately against the wall without creating installation compatibility issues.
However, many homeowners encounter a common installation error when they place a 12-inch rough-in toilet in a 14-inch space. This mismatch creates a noticeable 2–3 inch gap between the tank and the wall, resulting in both a functional and aesthetic compromise. Beyond the visual concerns, this installation compatibility issue can make regular maintenance more challenging and potentially impact the toilet's long-term stability and performance.
Important Note: Mismatched installations increase leak risks by 40% (Plumbing Manufacturers International, 2023). According to Kohler's 2023 catalog, only 8% of their toilets offer 14-inch rough-in options versus 92% for 12-inch models.
Modern Availability and Options
Today, 14-inch rough-in toilets are available from major manufacturers, though the selection is more limited than standard 12-inch models. Specific models like Kohler K-3817 Memoirs, American Standard 2878.016 Roxbury, and PROFLO PF9812 offer reliable 14-inch rough-in solutions that meet modern performance standards.
The 14-inch toilet bowl and tank combinations are engineered to work specifically with this measurement, ensuring proper fit and function. White remains the dominant finish, with designer colors typically requiring custom orders or special purchases. These toilets typically extend the same distance into the room as their 12-inch counterparts, with the extra two inches accommodated by the tank positioning. For wider selections, check online specialty retailers like lowes.com or homedepot.com, which often carry more options than local big-box stores.
Note: We may earn commission from third-party links. Always verify NSF/UPC compliance.
Installation Considerations
When installing a 14-inch rough-in toilet, it's crucial to verify your measurement is accurate. Many homeowners discover they actually have a 14.5-inch or 13.5-inch rough-in, which can affect toilet selection. Always measure from the finished wall (not including baseboards) to the center of the toilet flange or existing toilet bolts. Baseboards add 0.5–0.75 inches, distorting measurements and potentially leading to installation problems.
For maximum precision, professional plumbers recommend using a laser measure device. As master plumber Thomas Wilson (NAMP-certified) advises, "Verifying flange condition before installation is essential. A damaged or improperly positioned flange can compromise even the most precisely measured toilet installation."
If you're unsure about your measurement, it's better to choose a toilet specifically designed for your rough-in size rather than attempting to make a standard 12-inch model work in a 14-inch space. This ensures proper installation, prevents gaps, and maintains the toilet's structural integrity over time.
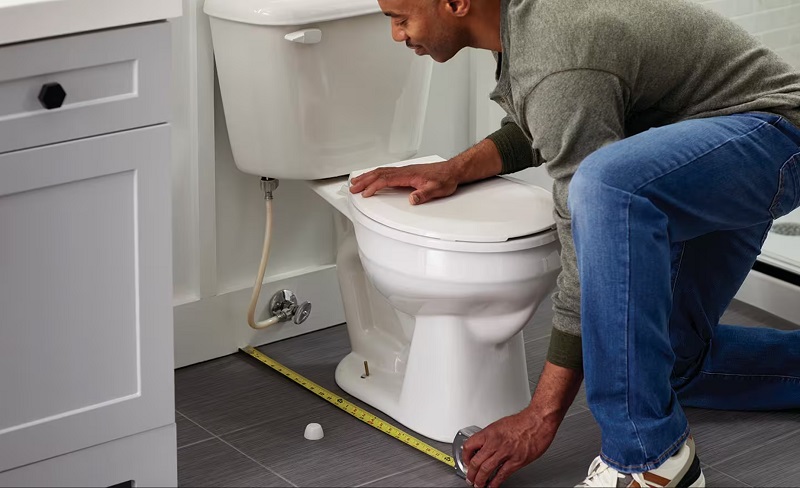
How to Accurately Measure Your 14-Inch Rough-In Toilet: A Step-by-Step Guide
Precise measurement of your 14-inch rough-in toilet space is the foundation of a successful installation. Many homeowners make critical measurement errors that lead to purchasing incompatible toilets and expensive returns. Follow this comprehensive guide to ensure accurate rough-in verification the first time.
Why Accurate Measurement Matters
Incorrect rough-in measurements can cause several significant problems:
- Installation Incompatibility: The toilet won't properly align with your plumbing system.
- Visible Wall Gaps: Incorrect sizing creates unattractive spaces between the tank and wall.
- Plumbing Complications: Misalignment can cause leaks, improper drainage, or clogs.
- Non-Returnable Purchases: Most retailers won't accept toilets as returns once packages are opened.
Essential Measurement Tools
Before measuring your 14-inch toilet rough-in, gather these tools for accurate rough-in verification:
- Measuring Tape: Use a rigid, high-quality tape measure for precise measurements.
- Documentation Materials: Notepad and pencil to record all measurements immediately.
- Lighting Equipment: Flashlight to clearly see behind and around the toilet area.
- Alignment Tools: Level or carpenter's square to ensure perpendicular measurement.
Step-by-Step Measurement Process: Existing Toilet
When your current toilet is still installed, follow these precise steps for accurate rough-in verification:
- Locate Mounting Bolts: Find the two floor bolts at the toilet base (remove plastic caps if necessary).
- Measure From Finished Wall: Position your tape measure against the finished wall surface (not baseboards or molding).
- Important: Measure to the center of the toilet bolts, not their edges.
- The finished wall refers to drywall or tile, excluding all trim pieces.
- Verify Measurement Accuracy: Take measurements from both bolts to confirm consistency.
- Measurements should be identical or very close.
- Significant differences may indicate toilet misalignment.
Step-by-Step Measurement Process: No Existing Toilet
For bathrooms without an installed toilet, follow these steps:
- Identify the Toilet Flange: Locate the circular pipe fitting on the floor (may have a temporary cover).
- Measure to Flange Center: Extend measuring tape from finished wall to the exact center of the flange opening.
- This center point measurement determines your 14-inch rough-in toilet requirement.
- Account for Construction Stage: If measuring before wall completion:
- Add ½ inch for standard drywall thickness.
- Add additional thickness for planned tile or wall treatments.
Common Measurement Errors to Avoid
- Measuring From Baseboards: A critical mistake is measuring from baseboards rather than the actual wall surface. Baseboards typically add ½–¾ inch, potentially causing you to misidentify your 14-inch rough-in toilet space.
- Overlooking Wall Finish Thickness: During renovations, account for all wall materials that will be added:
- Standard drywall: ½ inch
- Tile: Varies by type (typically ¼–½ inch)
- Wainscoting or panels: Varies by style
- Non-Perpendicular Measurement: Always measure straight back from the wall at a 90-degree angle. Angled measurements produce inaccurate results and compromise accurate rough-in verification.
Understanding Rough-In Variations
Standard Dimensions: While most modern homes use 12-inch rough-ins, 14-inch rough-in toilets are common in homes built between the 1920s and 1960s. Some compact bathrooms may have 10-inch rough-ins.
Between-Size Measurements: If your measurement falls between standard sizes (e.g., 13 inches), consider these options:
- Size Down: Choose the smaller rough-in size, as a 14-inch rough-in toilet won't properly fit a 13-inch space.
- Install Adapter: Use offset flanges to adjust your plumbing configuration.
- Professional Consultation: Have a licensed plumber evaluate your specific situation.
Expert Measurement Tips
- Check Wall Verticality: Verify your wall is perfectly vertical. Leaning walls can distort measurements and affect toilet fit.
- Anticipate Future Changes: Consider upcoming renovations when measuring. New tile or wall treatments will alter your effective rough-in distance.
- Document Everything: Photograph your measurement process and record all dimensions. This documentation is invaluable when selecting your 14-inch rough-in toilet.
Final Measurement Verification Checklist
Before purchasing your 14-inch rough-in toilet, confirm these critical points for accurate rough-in verification:
- Wall Starting Point: Measured from finished wall surface, not baseboards/molding.
- Bolt Center Alignment: Measured to the center of mounting bolts, not their edges.
- Multiple Measurement Verification: Confirmed with repeated measurements.
- Wall Finish Consideration: Included thickness of all wall materials.
- Proper Documentation: Recorded all measurements with photos and notes.
Pro Tip
Consider creating a simple diagram of your measurements, showing the distance from the wall to the flange center. This visual reference can be extremely helpful when shopping for your 14-inch rough-in toilet.
Challenges of a 14-Inch Rough-In Toilet
Installing or replacing a 14-inch rough-in toilet comes with several unique challenges that can make the process more difficult and expensive than working with standard 12-inch models. Understanding these challenges helps homeowners make informed decisions about their bathroom renovation projects.
Limited Model Availability Versus Industry Standards
The most significant challenge with 14-inch rough-in toilets is the limited model availability compared to standard 12-inch models. While every major manufacturer produces dozens of 12-inch rough-in toilets, the options for 14-inch toilet rough-in models are extremely limited.
Why Selection is So Limited:
- Market Demand: Since 12-inch rough-ins became the standard, manufacturers focus their production on this size.
- Older Standard: 14-inch rough-in toilets were more common in homes built between the 1920s and 1960s, making them a niche market.
- Cost vs. Volume: Manufacturers produce fewer 14-inch rough-in toilets because demand is lower, creating a supply shortage.
What This Means for Homeowners:
- Fewer style options available in 14-inch rough-in toilet models.
- Limited choices in bowl shapes (round vs. elongated).
- Fewer color options beyond standard white.
- Less variety in toilet heights and special features.
Significantly Higher Costs
14-inch rough-in toilets typically cost 20–40% more than their 12-inch counterparts. Many homeowners report finding 14-inch rough-in toilets that cost nearly double the price of comparable 12-inch models.
Cost Factors Include:
- Lower Production Volume: Manufacturers produce fewer 14-inch rough-in toilets, making each unit more expensive.
- Specialty Item Status: These toilets are considered specialty items rather than standard inventory.
- Limited Competition: With fewer manufacturers making 14-inch rough-in toilets, there's less price competition.
- Special Ordering: Many 14-inch rough-in toilets must be special-ordered, adding to the overall cost.
Installation Complications
Installing a 14-inch rough-in toilet presents several technical challenges that don't exist with standard models.
Gap Issues When Using Wrong Size: Many homeowners make the mistake of installing a 12-inch rough-in toilet in a 14-inch space, creating significant problems:
- Unsightly Gap: Using a 12-inch toilet creates a 2–3 inch gap between the tank and wall.
- Cleaning Difficulties: The gap makes it harder to clean behind the toilet.
- Aesthetic Problems: The space looks unfinished and unprofessional.
- Potential Stability Issues: The toilet may not sit as securely without proper wall support.
Measurement Confusion: 14-inch rough-in toilet measurements can be confusing, especially in older homes:
- Actual vs. Labeled: Some toilets labeled as 14-inch rough-in may still leave gaps due to design variations.
- Floor Modifications: Changes to flooring over the years can affect the actual rough-in measurement.
- Wall Thickness: Different wall finishes can impact the final measurement.
Maintenance and Replacement Challenges
Owning a 14-inch rough-in toilet creates ongoing maintenance challenges:
Parts Availability:
- Limited Repair Parts: Replacement parts for 14-inch rough-in toilets may be harder to find.
- Longer Wait Times: Special ordering parts can take weeks instead of days.
- Higher Part Costs: When available, parts often cost more than standard toilet parts.
Future Replacement Difficulties:
- Continuing Scarcity: The 14-inch rough-in toilet selection continues to shrink as manufacturers focus on standard sizes.
- Forced Upgrades: Eventually, homeowners may need to modify their plumbing to accommodate standard toilets.
- Resale Impact: Non-standard rough-ins may significantly deter future buyers who are concerned about potential replacement costs and limited availability.
Professional Installation Requirements
Many 14-inch rough-in toilet installations require professional help:
Specialized Knowledge:
- Proper Measurement: Professionals know how to accurately measure and verify 14-inch rough-in requirements.
- Adapter Installation: Installing offset flanges or adapters often requires plumbing expertise.
- Code Compliance: Ensuring installations meet local building codes.
Additional Tools and Materials:
- Offset Flanges: May need special adapters to make standard toilets work.
- Custom Solutions: Some installations require custom modifications.
- Warranty Considerations: Professional installation often required to maintain warranty coverage.
Renovation Complications
14-inch rough-in toilets can complicate bathroom renovation projects:
Design Constraints:
- Limited Toilet Styles: Fewer 14-inch rough-in toilet options may not match desired bathroom aesthetics.
- Color Matching: Limited color options for 14-inch rough-in toilets may not coordinate with other fixtures.
- Size Restrictions: May not find 14-inch rough-in toilet in desired bowl shape or size.
Whether choosing to work with the existing 14-inch rough-in or modifying the space for standard toilets, proper planning and professional consultation can help overcome these obstacles. The additional costs and complications should be factored into your renovation budget and timeline.
Using Offset Flanges and Adapters for 14-Inch Rough-In Toilets
When dealing with a 14-inch rough-in toilet, one of the biggest challenges is finding a toilet that fits perfectly in the space. Since 14-inch rough-in toilets are less common, sometimes homeowners want to use a standard 12-inch rough-in toilet instead. This is where offset flanges and adapters come in handy. They help adjust the plumbing connection so you can install a toilet that doesn't exactly match the 14-inch rough-in measurement.
What Are Offset Flanges?
An offset flange is a special plumbing fitting that shifts the position of the toilet drain pipe slightly forward or backward. This adjustment allows you to install a toilet designed for a 12-inch rough-in in a space with a 14-inch rough-in, or vice versa.
- How It Works: The offset flange moves the center of the drain opening closer to the wall or further away, depending on your needs.
- Adjustment Range: Most offset flanges can shift the drain by about 1 to 2 inches. However, the International Plumbing Code (IPC) limits offsets to a maximum of 1 inch in many regions to maintain proper drainage function.
- Material: They are usually made from durable PVC or ABS plastic, sometimes with metal reinforcements.
Benefits of Using Offset Flanges:
- Flexibility: Offset flanges give you more toilet options by allowing standard 12-inch rough-in toilets to fit in a 14-inch rough-in space.
- Cost Savings: Instead of buying a specialty 14-inch rough-in toilet, you can use a more common and often less expensive 12-inch model.
- Easier Replacement: If your current 14-inch rough-in toilet breaks, an offset flange can help you replace it without expensive plumbing modifications.
Limitations to Consider
- Installation Complexity: Installing an offset flange is more complex than a standard flange and usually requires a professional plumber.
- Potential for Leaks: Because the drain pipe is offset, there is a slightly higher risk of leaks if the flange is not installed perfectly level and sealed.
- Building Codes: Some local plumbing codes limit how much offset is allowed, so always check your local regulations before installation. Many jurisdictions following IPC standards restrict offsets to ensure proper drainage.
- Warranty Concerns: Using offset flanges may void toilet warranties from some manufacturers who specify installation requirements. Always review warranty terms before installation.
- Drainage Slope Issues: Improper offset installations risk creating insufficient drain slope, which can lead to frequent clogs and poor flushing performance. The standard ¼-inch per foot slope requirement must be maintained even with an offset flange.
Adapters for 14-Inch Rough-In Toilets
Besides offset flanges, some manufacturers offer adapters or conversion kits designed specifically for 14-inch rough-in toilets.
- How Adapters Work: These kits include specially designed flanges and connectors that adjust the drain position and help seal the connection while maintaining proper drainage angles required by plumbing codes.
- Compatibility: Adapters are usually designed to work with specific toilet brands or models, so check compatibility before purchasing. Using manufacturer-approved adapters helps maintain warranty coverage.
- Installation: Like offset flanges, adapters often require professional installation to ensure a secure, leak-free fit and code compliance.
When Should You Use Offset Flanges or Adapters?
- When your bathroom has a 14-inch rough-in toilet flange, but you want to install a 12-inch rough-in toilet because of availability or cost.
- When you want to avoid costly plumbing modifications that would move the drain pipe, provided the offset doesn't violate local code requirements.
- When you want a quick solution to fit a new toilet in an older bathroom with non-standard rough-in measurements, but only after confirming code compliance.
Professional Installation is Recommended
Because offset flanges and adapters affect the plumbing's alignment and sealing, professional installation is highly recommended. A licensed plumber will:
- Ensure the flange is level and properly secured according to manufacturer specifications.
- Verify that the offset does not violate local plumbing codes, particularly IPC regulations limiting offset distance.
- Test for leaks and proper drainage after installation, confirming the required minimum ¼-inch per foot slope is maintained.
- Ensure that warranty requirements are met by following manufacturer installation guidelines.
Using offset flanges and adapters is a smart way to overcome the challenges of a 14-inch rough-in toilet space when done correctly. They provide flexibility, cost savings, and easier toilet replacement options. However, these solutions require careful installation by licensed professionals and may not be suitable for every situation due to code restrictions and warranty considerations. Always consult with a professional plumber to find the best approach for your bathroom that maintains both performance and compliance.
FAQs About 14-Inch Rough-In Toilets
- Can You Replace a 14-Inch Rough-In Toilet with a 12-Inch One?
- No, not without modifications. A 12-inch rough-in toilet installed in a 14-inch space leaves a 2-inch gap between the tank and wall, creating an awkward appearance and cleaning challenges.
- What Is the Typical Toilet Bowl Height for a 14-Inch Rough-In Toilet?
- 14-inch rough-in toilets come in two heights:
- Standard Height: 14–15 inches from floor to seat top.
- Comfort Height: 16–17 inches, ideal for seniors and those with mobility issues.
- Are 14-Inch Rough-In Toilets Available in Round or Elongated Shapes?
- Both shapes are available. Round bowls work better in tight spaces, while elongated bowls offer more comfort but require additional room.
- Can I Use a 14.5-Inch Rough-In Toilet in a 14-Inch Space?
- No. Precise measurement is essential for proper fit and function. Even a ½-inch mismatch causes leaks and installation issues.
- Are 14-Inch Rough-In Toilets More Expensive Than Standard Models?
- Yes. Limited availability and specialty manufacturing typically make 14-inch rough-in toilets more expensive than standard 12-inch models.
- What Retrofit Solutions Exist for Adapting 14-Inch Rough-In Spaces?
- Offset flanges and specialized adapters can help install standard toilets in 14-inch rough-in spaces, though professional installation is recommended to ensure proper function and code compliance.
Conclusion
Replacing or installing a 14-inch rough-in toilet doesn't have to be a headache. By understanding the key measurements, challenges, and options available, and knowing that specialized suppliers (e.g., JARA Smart) stock these niche models, you can ensure your bathroom projects go smoothly and look great for years to come.
If you're sourcing 14-inch rough-in toilets for vintage homes, consult a licensed plumber before making any plumbing modifications. This professional guidance will help you navigate both technical requirements and building codes while solving your 14-inch rough-in toilet needs with confidence.
Read more:
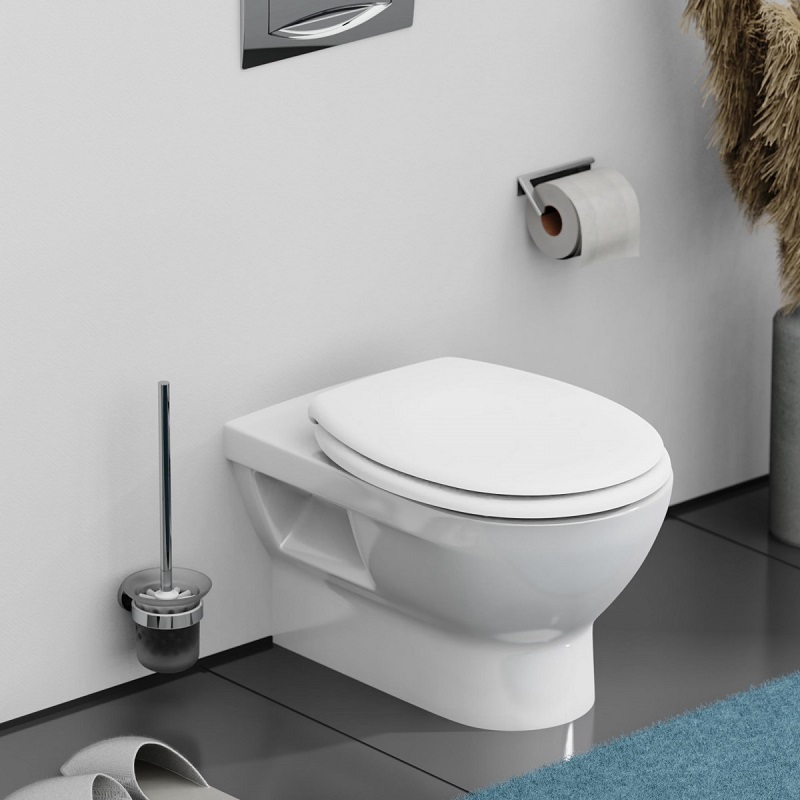
Pros and Cons of Wall-Hung Toilets: Is It Right for You?
How to Clean a Toilet and Remove Tough Stains Effectively
How To Use a Bidet for A Woman?